

If you, like most people on residential connections, are not so fortunate to have a static IP – running any kind of external facing service (e.g., website, calibre eBook server, web UI for your torrent application, Plex or other media server) presents a challenge. Connecting via IP address will work, however as soon as your ISP decides to change your IP, you will have to find out what your new IP is, share it with your users and update it in any client applications that rely on your web service. Not an ideal option, to say the least.
If you want people all over the world to reach your site or web application, you need an easily remembered domain name. It’s much easier to remember johnsmithplex.com than something like 45.123.789.13. However, just having a domain name is not enough if you have a dynamic IP – you also have to make sure to keep it up-to-date so that it always points to your current IP address.
To solve this problem, many domain providers utilize Dynamic DNS system, also known as DynDNS or DDNS. It allows updating DNS records of your domain whenever the IP of your server changes. Many modern consumer routers (such as Asus RT-N66U) include this functionality out of the box by providing you with a free domain name and automatically updating its IP whenever your external IP changes. If you’re beginner, this might be the best option as it is very easy to configure and doesn’t require running any additional server or software. The downside is that you have to use your router manufacturer’s domain name (such as johnsmith.asuscomm.com). If you want (or already own) your personal domain name and would like to use it for a dynamic IP host, you can accomplish it by setting up a DDNS update client, such as ddclient. ddclient is a program that can run on your Linux server and automatically report your new IP to your domain name provider whenever your IP changes.
Requirements
- Linux server (Ubuntu 16.06 LTS is used in this tutorial, but it should work on any Linux distribution). This server needs to be up 24/7 to make sure your DNS is updated as soon as possible whenever your IP changes
- Domain name purchased through a domain registrar (I used namecheap)
- Access to your domain’s DNS settings; your DNS server must support Dynamic DNS
- Basic knowledge of Linux terminal commands
Note: at the time of this writing, the current version of ddclient is 3.8.2. The tutorial steps are applicable for this version and may not apply for future versions of ddclient.
The tutorial assumes you’re running as a non-root user, so most commands will be listed with sudo.
Tutorial
1. Purchase domain name
Purchase a domain name for your website or application (if you haven’t already). You will need to make sure you have access to your domain’s DNS settings and that it supports Dynamic DNS. Namecheap, the registrar I use, provides both of these options.
2. Enable DDNS for your domain
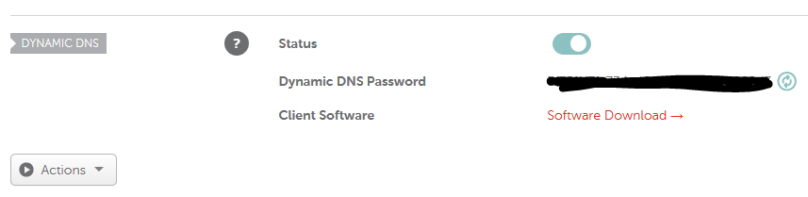
Enable dynamic DNS in your domain’s DNS settings and note the login/password that will be used to update your IP. If you use Namecheap, this can be found in “Advanced DNS” section of your domain.
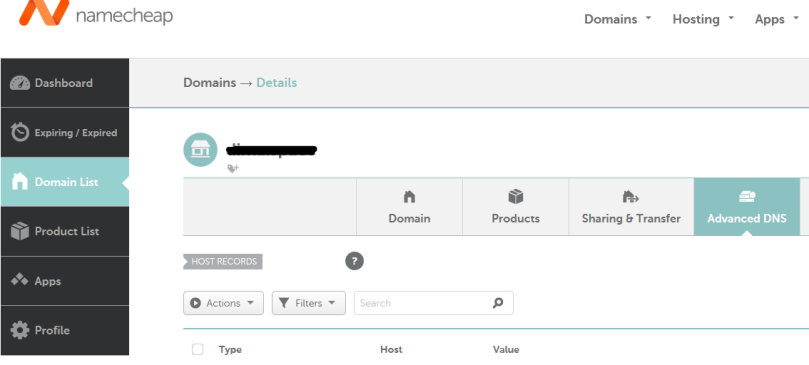
Make sure to enable the dynamic DNS for your domain. You will need to note the login and password that’s used to update your DDNS (Dynamic DNS password). Namecheap uses your domain name as login. Make sure to note/copy your domain name and the password, you will need them later to configure ddclient.
3. Install ddclient
Install ddclient on your Linux machine. To install on Ubuntu or any Debian-based system, simply run
sudo apt install ddclient
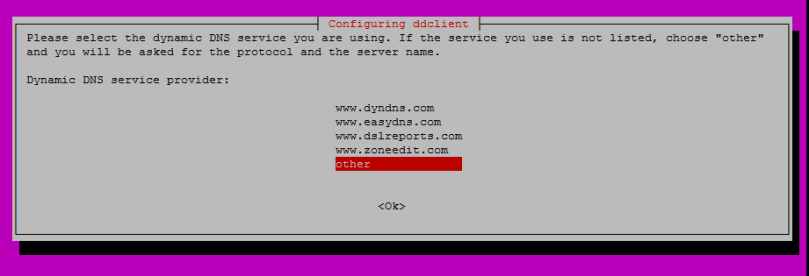
Once installed, a configuration wizard will automatically start. The configuration wizard did not work for me as it does not provide all options in the GUI. To configure ddclient properly, we will have to manually edit configuration files. For now, just enter anything random or leave the fields blank in the wizard when prompted just to complete it. Don’t worry about entering correct values; we will manually configure them in the next step.
Once the wizard completes, it’ll generate two config files (/etc/ddclient.conf and /etc/default/ddclient) with the values you entered. We will now edit those files and enter correct configuration values.
4. Configure /etc/ddclient.conf
The first config file is located at /etc/ddclient.conf. Edit this file with a text editor of your choice, I use nano:
sudo nano /etc/ddclient.conf
The file will have the settings you provided during the wizard, we will delete them and replace with the following:
# /etc/ddclient.conf
syslog=yes              # log the output to syslog
mail=root               # send email notifications to root
mail-failure=root       # send email when failed
ssl=yes                 # use ssl when updating IP
use=web, web=dynamicdns.park-your-domain.com/getip # look up external IP from this URL
protocol=namecheap
server=dynamicdns.park-your-domain.com
login=your-domain.com
password=your-ddns-password
@,*    # wildcard, to update all subdomains, like a.your-domain.com, b.your-domain.com
The above configuration assumes you’re using Namecheap as your DDNS provider. You will only need to change the login (your domain name) and password (your DDNS password obtained in step 2). If you’re using a provider other than Namecheap, you will also need to change the protocol and server parameters. You will have to obtain the server name from your DDNS provider. For full list of protocols supported by ddclient and examples of how to configure each one, run
ddclient -help
5. Configure /etc/default/ddclient
If you only want to run ddclient on demand, you are done. You can run it with
sudo ddclient and it will pull your current external IP and update your DNS server. However, this is pretty useless as you will most likely want it to run in the background and periodically check/update your IP without manual intervention. To do that, you need to configure ddclient to run as daemon by editing the file /etc/default/ddclient.
sudo nano /etc/default/ddclient
Set run_daemon="true" and set your daemon_interval to how often you want ddclient to update dynamic DNS (in seconds). Setting it to 300 will make ddclient run every 5 minutes which should be sufficient. You can configure yours to run more (or less) often to your liking.
# /etc/default/ddclient
# Set to "true" if ddclient should be run every time DHCP client ('dhclient'
# from package isc-dhcp-client) updates the systems IP address.
run_dhclient="false"

# Set to "true" if ddclient should be run every time a new ppp connection is
# established. This might be useful, if you are using dial-on-demand.
run_ipup="false"

# Set to "true" if ddclient should run in daemon mode
# If this is changed to true, run_ipup and run_dhclient must be set to false.
run_daemon="true"

# Set the time interval between the updates of the dynamic DNS name in seconds.
# This option only takes effect if the ddclient runs in daemon mode.
daemon_interval="300"
7. Test configuration
Verify the configuration by running ddclient manually:
sudo ddclient
If everything is configured correctly, you should get this:
SUCCESS: updating @: good: IP address set to 45.123.789.13
If you receive errors, make sure your configuration is correct in both /etc/ddclient.conf and /etc/default/ddclient files. It’s also useful to run ddclient with -debug or -verbose option to get more information on the error.
8. Restart the ddclient service
Finally, once you verify ddclient is configured correctly, run ddclient as a service. It may already be running, but you will want to restart it to make sure it loads the updated configuration:
sudo service ddclient restart
The service will run in the background and update your domain’s DNS according to the interval you set in daemon_interval. To verify it’s running, run
sudo service ddclient status
or run htop and verify ddclient process is running.
It will also log to syslog anytime it updates the IP and send an email notification to root’s email address.
Troubleshooting
If at any point you get an error saying something about /var/cache/ddclient/ddclient.cache, simply delete the cache file and restart the ddclient service:
sudo rm /var/cache/ddclient/ddclient.cache

sudo service ddclient restart
Feedback
If you have any questions or suggestions to improve this tutorial, please comment below.

Hi, this is a great tutorial, thank you. I notice the config does not seem to include the specific sub-domains associated with the account… does this mean that by using the root domain as the login that ALL subdomains are updated or only the root, or have I missed something altogether? For example will this config update a.example.com and b.example.com and c.example.com if they are all setup on the same account? Thanks again
LikeLike
To update all subdomains, I add this to the config file (this might be DNS provider dependent):
wildcard=yes
Since writing this tutorial I have also added this to the bottom of the config file:
@,*
That seems to work for me, I can do a DNS lookup for any subdomain and it returns the same IP.
LikeLike
Thanks for getting back to me so quickly, I tried that (I am using Namecheap) and it gave me a bunch of errors. I also tried to add subdomains as per the ‘-help’ and this didn’t seem to work either. No big issue, i will spend some more time paying around with it.
LikeLike
Hello again,
Sorry it really did take me 6 months to take another look at this. Thought I would share my config. I read a couple of other websites which suggested that the config below is required (even though it still doesn’t really make sense to me), anyway, here is how I got it working. Essentially you need one entry to update the root domain (if required) and then a second entry to login and change all of the subdomains;
#### rootdomain
login=example.com
password=xxxxxxxxxxxxxxxxxx
@
#### subdomains
login=example.com
password=xxxxxxxxxxxxxxxxxx
@.example.com, www, mail, whatever
Cheers
LikeLiked by 1 person
Hi this ddclient.conf file is also awesome for multiple domains like i have
Here is an example of setting up multiple sites in DDClient:
# +————————-+
# | namecheap ddns settings |
# +————————-+
daemon=600
ssl=yes
use=web
web=dynamicdns.park-your-domain.com/getip
protocol=namecheap
server=dynamicdns.park-your-domain.com
# +————–+
# | mydomain.com |
# +————–+
login=mydomain.com
password=’ddns_password_for_mydomain.com’
@.mydomain.com
# +————–+
# | mydomain.org |
# +————–+
login=mydomain.org
password=’ddns_password_for_mydomain.org’
@.mydomain.org
# +————–+
# | mydomain.net |
# +————–+
login=mydomain.net
password=’ddns_password_for_mydomain.net’
@.mydomain.net
LikeLike
Thank you. This tutorial was simple, helpful, and go the job done.
LikeLike
[…] https://serdima.wordpress.com/2018/04/23/tutorial-updating-dynamic-dns-with-ddclient/ […]
LikeLike